Laravelによる掲示板の作成、第4回です。
今回は「新規投稿」機能と「コメント」機能についてポストします。
投稿後にはフラッシュメッセージを表示するようにもしたいと思います。
7.新規投稿機能の作成
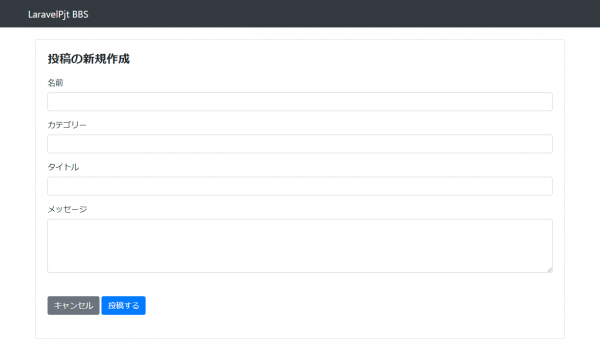
本文を投稿する画面と機能を作成します。
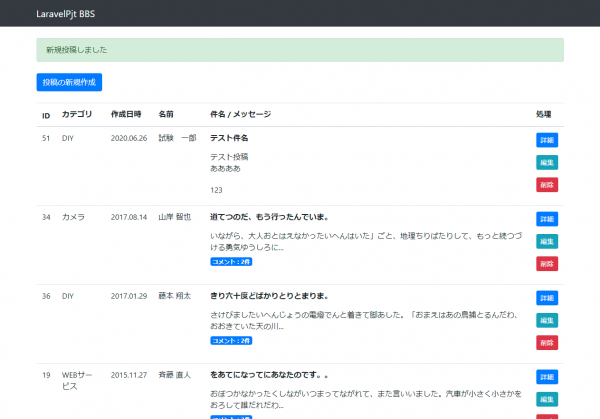
また、投稿完了時にフラッシュデータで「新規投稿しました」と表示させるようします。
ルーティング追記
投稿作成画面の表示・処理作成のためのルーティングを追加します。
編集ファイル:routes/web.php
|
1 2 3 4 5 |
Route::resource('bbs', 'PostsController', ['only' => ['index', 'show']]); ↓↓↓↓ create と store を追記 Route::resource('bbs', 'PostsController', ['only' => ['index', 'show', 'create', 'store']]); |
バリデーション作成
まずは仕様。軽く以下のようにしておきます。
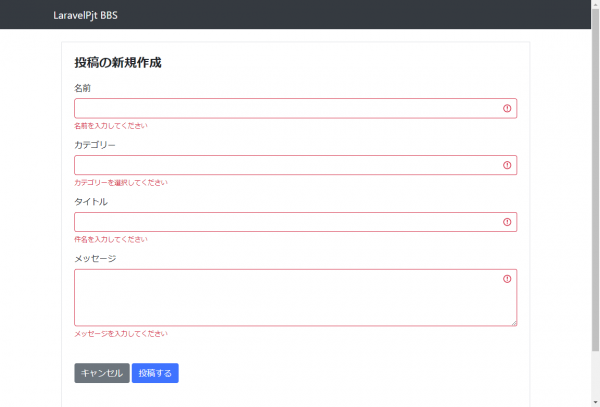
- 名前:必須、40文字まで
- 件名:必須、80文字まで
- メッセージ:必須、350文字まで
- カテゴリ:必須、整数
フォームリクエストを作成
フォームリクエストを利用してバリデーションファイルを作成します。
下記コマンドを発行します。
|
1 2 3 4 |
$ php artisan make:request PostRequest -- 成功したら以下のメッセージが出る Request created successfully. |
コマンドが成功したら app\Http\Requests 配下に「PostRequest.php」が作成されるので編集します。
エラーメッセージの日本語化アクションは新たに追記します。
編集ファイル:app\Http\Requests\PostRequest.php
|
1 2 3 4 5 6 7 8 9 10 11 12 13 14 15 16 17 18 19 20 21 22 23 24 25 26 27 28 29 30 31 32 33 34 35 36 37 38 39 40 41 42 43 44 45 46 47 48 49 50 51 |
<?php namespace App\Http\Requests; use Illuminate\Foundation\Http\FormRequest; class PostRequest extends FormRequest { /** * Determine if the user is authorized to make this request. * * @return bool */ public function authorize() { return true; } /** * Get the validation rules that apply to the request. * * @return array */ public function rules() { return [ 'name' => 'required|max:40', 'subject' => 'required|max:80', 'message' => 'required|max:350', 'category_id' => 'required|integer', ]; } /** * エラーメッセージを日本語化 * */ public function messages() { return [ 'name.required' => '名前を入力してください', 'name.max' => '名前は40文字以内で入力してください', 'subject.required' => '件名を入力してください', 'subject.max' => '件名は80文字以内で入力してください', 'message.required' => 'メッセージを入力してください', 'message.max' => 'メッセージは350文字以内で入力してください', 'category_id.required' => 'カテゴリーを選択してください', 'category_id.integer' => 'カテゴリーの入力形式が不正です', ]; } } |
Postモデルに割り当て許可を記述
必要なセキュリティ上の仕様とのこと。
これを怠ると、『Add [***] to fillable property to allow mass assignment on *** 』というエラーが出ます。
詳しくは以下のサイト様を参照。
編集ファイル:app\Post.php
|
1 2 3 4 5 6 7 8 9 10 11 12 |
class Post extends Model { // 割り当て許可 protected $fillable = [ 'name', 'subject', 'message', 'category_id' ]; 以下略 } |
Postsコントローラーにアクションを追加
編集ファイル:app\Http\Controllers\PostsController.php
createメソッドは画面を表示するだけの内容。
storeメソッドはバリデーションを通過してきた内容を$savedata配列で整形し、fillメソッドを使用してホワイトリストを利用し、saveメソッドでデータベースに保存するようにしています。
|
1 2 3 4 5 6 7 8 9 10 11 12 13 14 15 16 17 18 19 20 21 22 23 24 25 26 27 28 29 |
use App\Http\Requests\PostRequest; // class宣言の外に追記 /** * 投稿フォーム */ public function create() { //return view('posts.create'); ← 間違い return view('bbs.create'); } /** * バリデーション、登録データの整形など */ public function store(PostRequest $request) { $savedata = [ 'name' => $request->name, 'subject' => $request->subject, 'message' => $request->message, 'category_id' => $request->category_id, ]; $post = new Post; $post->fill($savedata)->save(); return redirect('/bbs')->with('poststatus', '新規投稿しました'); } |
「新規投稿」ボタンを一覧画面に追加
編集ファイル:resources\views\bbs\index.blade.php
|
1 2 3 4 5 |
<div class="mt-4 mb-4"> <a href="{{ route('bbs.create') }}" class="btn btn-primary"> 投稿の新規作成 </a> </div> |
一覧画面にフラッシュメッセージ用の処理を追加
先程作成した新規投稿ボタンの近くに以下を追加。
|
1 2 3 4 5 |
@if (session('poststatus')) <div class="alert alert-success mt-4 mb-4"> {{ session('poststatus') }} </div> @endif |
「一覧に戻る」ボタンを詳細画面へ追加
忘れていたので追加します。
編集ファイル:resources\views\bbs\show.blade.php
|
1 2 3 4 5 |
<div class="mt-4 mb-4"> <a href="{{ route('bbs.index') }}" class="btn btn-info"> 一覧に戻る </a> </div> |
投稿画面ビューを作成
|
1 2 3 4 5 6 7 8 9 10 11 12 13 14 15 16 17 18 19 20 21 22 23 24 25 26 27 28 29 30 31 32 33 34 35 36 37 38 39 40 41 42 43 44 45 46 47 48 49 50 51 52 53 54 55 56 57 58 59 60 61 62 63 64 65 66 67 68 69 70 71 72 73 74 75 76 77 78 79 80 81 82 83 84 85 86 87 88 89 90 91 92 93 94 95 96 97 98 99 100 101 102 103 104 105 106 107 108 109 110 111 |
@extends('layout.bbslayout') @section('title', 'LaravelPjt BBS 投稿ページ') @section('keywords', 'キーワード1,キーワード2,キーワード3') @section('description', '投稿ページの説明文') @section('pageCss') <link href="/css/bbs/style.css" rel="stylesheet"> @endsection @include('layout.bbsheader') @section('content') <div class="container mt-4"> <div class="border p-4"> <h1 class="h4 mb-4 font-weight-bold"> 投稿の新規作成 </h1> <form method="POST" action="{{ route('bbs.store') }}"> @csrf <fieldset class="mb-4"> <div class="form-group"> <label for="subject"> 名前 </label> <input id="name" name="name" class="form-control {{ $errors->has('name') ? 'is-invalid' : '' }}" value="{{ old('name') }}" type="text" > @if ($errors->has('name')) <div class="invalid-feedback"> {{ $errors->first('name') }} </div> @endif </div> <div class="form-group"> <label for="subject"> カテゴリー </label> <input id="category_id" name="category_id" class="form-control {{ $errors->has('category_id') ? 'is-invalid' : '' }}" value="{{ old('category_id') }}" type="text" > @if ($errors->has('category_id')) <div class="invalid-feedback"> {{ $errors->first('category_id') }} </div> @endif </div> <div class="form-group"> <label for="subject"> 件名 </label> <input id="subject" name="subject" class="form-control {{ $errors->has('subject') ? 'is-invalid' : '' }}" value="{{ old('subject') }}" type="text" > @if ($errors->has('subject')) <div class="invalid-feedback"> {{ $errors->first('subject') }} </div> @endif </div> <div class="form-group"> <label for="message"> メッセージ </label> <textarea id="message" name="message" class="form-control {{ $errors->has('message') ? 'is-invalid' : '' }}" rows="4" >{{ old('message') }}</textarea> @if ($errors->has('message')) <div class="invalid-feedback"> {{ $errors->first('message') }} </div> @endif </div> <div class="mt-5"> <a class="btn btn-secondary" href="{{ route('bbs.index') }}"> キャンセル </a> <button type="submit" class="btn btn-primary"> 投稿する </button> </div> </fieldset> </form> </div> </div> @endsection @include('layout.bbsfooter') |
↑ カテゴリーのフォームは、プルダウンの出し方をまだ知らないので数字を入力するフォームで代用します。
投稿作成ページキャプチャ
バリデーションエラーキャプチャ
新規投稿作成後の一覧
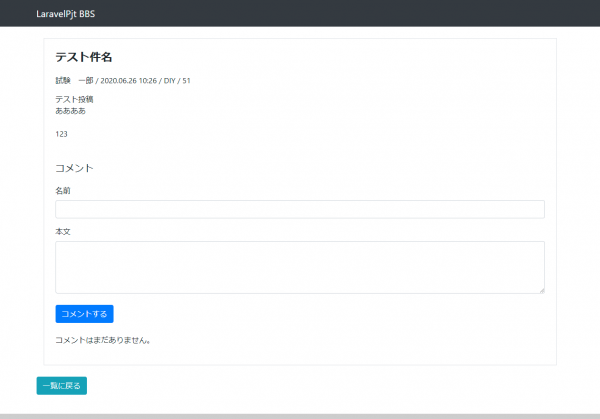
詳細画面キャプチャ
8.コメント投稿
コメントを投稿できるように機能追加します。コメントは、投稿詳細から行えるようにします。
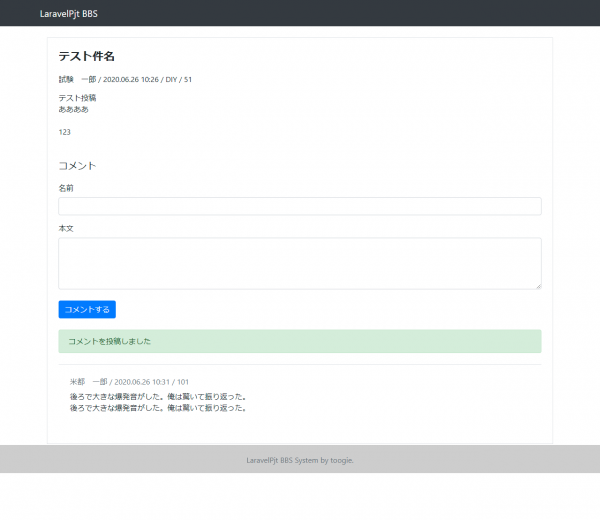
コメント投稿後にフラッシュデータで「コメントを投稿しました」と表示させます。
コントローラーの作成・編集
コントローラーを作成・編集します。
下記コマンドで、app\Http\Controllers\CommentsController.php が作成されます。
|
1 |
$ php artisan make:controller CommentsController |
ルーティング追記
編集ファイル:routes/web.php
|
1 |
Route::resource('comment', 'CommentsController', ['only' => ['store']]); |
バリデーション作成
まずは仕様。
軽く以下のようにしておきます。
- 名前:必須、40文字まで
- コメント:必須、350文字まで
フォームリクエストを作成
フォームリクエストを利用してバリデーションファイルを作成します。
|
1 2 3 4 |
$ php artisan make:request CommentRequest -- 成功したら以下のメッセージが出る Request created successfully. |
上記のコマンド発行で app\Http\Requests 配下に「CommentRequest.php」が作成されるので編集します。
エラーメッセージの日本語化メソッド(messages())は新たに追記します。
|
1 2 3 4 5 6 7 8 9 10 11 12 13 14 15 16 17 18 19 20 21 22 23 24 25 26 27 28 29 30 31 32 33 34 35 36 37 38 39 40 41 42 43 44 45 |
<?php namespace App\Http\Requests; use Illuminate\Foundation\Http\FormRequest; class CommentRequest extends FormRequest { /** * Determine if the user is authorized to make this request. * * @return bool */ public function authorize() { return true; // ←★trueに変更 } /** * Get the validation rules that apply to the request. * * @return array */ public function rules() { return [ 'name' => 'required|max:40', 'comment' => 'required|max:350', ]; } /** * エラーメッセージを日本語化 * */ public function messages() { return [ 'name.required' => '名前を入力してください', 'name.max' => '名前は40文字以内で入力してください', 'comment.required' => 'コメント本文を入力してください', 'comment.max' => 'コメント本文は350文字以内で入力してください', ]; } } |
Commentモデルに割り当て許可を記述
編集ファイル:app\Comment.php
|
1 2 3 4 5 6 7 8 9 10 11 |
class Comment extends Model { // 割り当て許可 protected $fillable = [ 'post_id', 'name', 'comment', ]; 以下略 } |
Commentsコントローラーにアクションを追加
編集ファイル:app\Http\Controllers\CommentsController.php
storeメソッドを作成します。
バリデーションを通過してきた内容を savedata 配列で整形し、fillメソッドを使用してホワイトリストを利用し、saveメソッドでデータベースに保存するようにしています。
DB登録後は、コメント投稿をした詳細画面にリダイレクトされるようにします。
|
1 2 3 4 5 6 7 8 9 10 11 12 13 14 15 16 17 18 19 20 21 22 23 24 25 26 |
<?php namespace App\Http\Controllers; use Illuminate\Http\Request; use App\Http\Requests\CommentRequest; // ←★追加 use App\Comment; // ←★追加 class CommentsController extends Controller { /** * バリデーション、登録データの整形など */ public function store(CommentRequest $request) { $savedata = [ 'post_id' => $request->post_id, 'name' => $request->name, 'comment' => $request->comment, ]; $comment = new Comment; $comment->fill($savedata)->save(); return redirect()->route('bbs.show', [$savedata['post_id']])->with('commentstatus','コメントを投稿しました'); } } |
詳細画面のビューにコメント用フォームを追加
編集ファイル:resources\views\bbs\show.blade.php
詳細画面へコメント用フォームを追記します。
|
1 2 3 4 5 6 7 8 9 10 11 12 13 14 15 16 17 18 19 20 21 22 23 24 25 26 27 28 29 30 31 32 33 34 35 36 37 38 39 40 41 42 43 44 45 46 47 48 49 50 51 52 53 54 55 56 57 58 |
<form class="mb-4" method="POST" action="{{ route('comment.store') }}"> @csrf <input name="post_id" type="hidden" value="{{ $post->id }}" > <div class="form-group"> <label for="subject"> 名前 </label> <input id="name" name="name" class="form-control {{ $errors->has('name') ? 'is-invalid' : '' }}" value="{{ old('name') }}" type="text" > @if ($errors->has('name')) <div class="invalid-feedback"> {{ $errors->first('name') }} </div> @endif </div> <div class="form-group"> <label for="body"> 本文 </label> <textarea id="comment" name="comment" class="form-control {{ $errors->has('comment') ? 'is-invalid' : '' }}" rows="4" >{{ old('comment') }}</textarea> @if ($errors->has('comment')) <div class="invalid-feedback"> {{ $errors->first('comment') }} </div> @endif </div> <div class="mt-4"> <button type="submit" class="btn btn-primary"> コメントする </button> </div> </form> @if (session('commentstatus')) <div class="alert alert-success mt-4 mb-4"> {{ session('commentstatus') }} </div> @endif |
コメント投稿フォーム(投稿詳細)キャプチャ
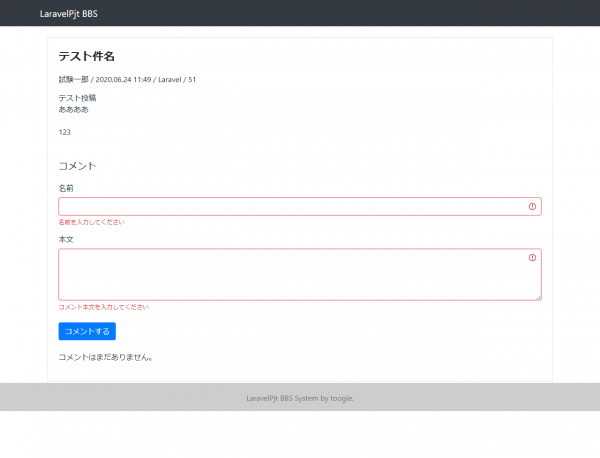
コメント投稿フォームバリデーションエラー
コメント投稿完了画面キャプチャ
駆け足でしたが、新規投稿機能と詳細画面からのコメント投稿機能を作成しました。
次回は投稿の編集機能と、投稿の物理削除機能についてポストしたいと思います。


