


現在作成中のシステムの管理画面にてサムネイル画像が必要になったので、WordPressの様な正方形の画像をPHP(GD)で作成する方法を備忘録としてポストします。
正方形のサムネイル画像を作る!
(手順1)イメージリソースを取得
まずはイメージリソースを取得。
そこから元画像の横・縦ピクセルサイズを取得
|
1 2 3 4 |
$ImageResource = imagecreatefromjpeg( $orgFile ); $width = imagesx( $ImageResource ); // 横幅 $height = imagesy( $ImageResource ); // 縦幅 |
imagecreatefromjpeg の仕様を見ると、「新しい画像をファイルあるいは URL から作成する」とあるので、$orgFileには、ローカルのファイルパスやURLが指定できるようです。
PHPマニュアルには以下のようにあります。
fopen wrappers が有効の場合、この関数のファイル名として URL を使用することができます。
PHPの設定に準拠するようですね。
imagesx() と imagesy() は、イメージリソースからそれぞれピクセルサイズを取得する関数です。
便利!
(手順2)一辺の長さを算出
次に、取得したピクセルサイズ比較して、短い方に合わせた一辺の長さを算出し、指定。
算数が全然できない人なので計算式が思いつかず、意外と苦戦してしまいました(汗)
|
1 2 3 4 5 6 7 8 9 10 11 12 13 |
if ($width >= $height) { // 横長の画像の時 $side = $height; $x = floor(($width - $height) / 2); $y = 0; $width = $side; } else { // 縦長の画像の時 $side = $width; $y = floor(($height - $width) / 2); $x = 0; $height = $side; } |
(手順3)画像の出力
最後に画像を出力。例は .jpg の場合。
|
1 2 3 4 5 6 7 8 9 10 11 12 |
// 保存先パス $savePath = "./image/"; // 出力ファイル名 $filename = "saveFileName_square.jpg"; // 出力ピクセルサイズで新規画像作成 $square_width = 100; $square_height = 100; $square_new = imagecreatetruecolor($square_width, $square_height); imagecopyresized($square_new, $ImageResource, 0, 0, $x, $y, $square_width, $square_height, $width, $height); imagejpeg($square_new, $savePath . $filename, 100); |
これでOK。
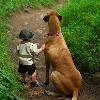
この画像が
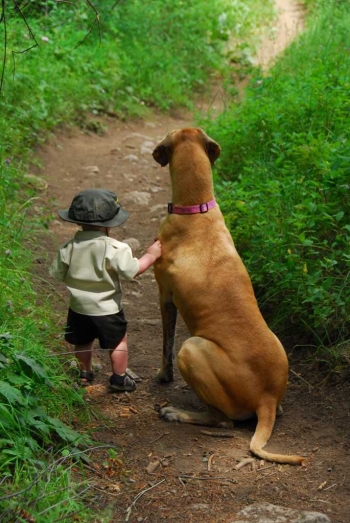
こうなってくれます。
ルーチン公開
と、いうことで、.jpg、.gif、.png に対応したものを作ったので公開。
もっと良い書き方があると思うので、参考程度に。
ちなみに以下のルーチンでは、透過gifをアップロードした場合に透過部が黒くなってしまうことは確認しています。
どうやって直すのかよく分かっていません(えー)
|
1 2 3 4 5 6 7 8 9 10 11 12 13 14 15 16 17 18 19 20 21 22 23 24 25 26 27 28 29 30 31 32 33 34 35 36 37 38 39 40 41 42 43 44 45 46 47 48 49 50 51 52 53 54 55 56 57 58 59 60 61 62 63 64 65 66 67 68 69 70 71 72 73 74 75 76 77 |
// 保存先パス $savePath = "./image/"; // 画像のピクセルサイズ情報を取得 $imginfo = getimagesize($orgFile); // イメージリソース取得 $ImageResource = imagecreatefromjpeg($orgFile); // イメージリソースから、横、縦ピクセルサイズ取得 $width = imagesx($ImageResource); // 横幅 $height = imagesy($ImageResource); // 縦幅 if ($width >= $height) { // 横長の画像の時 $side = $height; $x = floor(($width - $height) / 2); $y = 0; $width = $side; } else { // 縦長の画像の時 $side = $width; $y = floor(($height - $width) / 2); $x = 0; $height = $side; } switch ($imginfo[2]) { // jpeg case 2: // 出力ファイル名 $filename = "saveFileName_square.jpg"; // 出力ピクセルサイズで新規画像作成 $square_width = 100; $square_height = 100; $square_new = imagecreatetruecolor($square_width, $square_height); imagecopyresized($square_new, $ImageResource, 0, 0, $x, $y, $square_width, $square_height, $width, $height); imagejpeg($square_new, $savePath . $filename, 100); break; // gif case 1: // 出力ファイル名 $filename = "saveFileName_square.gif"; // 出力ピクセルサイズで新規画像作成 $square_width = $new_pic_width; $square_height = $new_pic_width; $square_new = imagecreatetruecolor($square_width, $square_height); imagecopyresampled($square_new, $ImageResource, 0, 0, $x, $y, $square_width, $square_height, $width, $height); imagegif($square_new, $upload_path . $filename, 100); break; // png case 3: // 出力ファイル名 $filename = "saveFileName_square.png"; // 出力ピクセルサイズで新規画像作成 $square_width = $new_pic_width; $square_height = $new_pic_width; $square_new = imagecreatetruecolor($square_width, $square_height); imagealphablending($square_new, false); // アルファブレンディングを無効 imageSaveAlpha($square_new, true); // アルファチャンネルを有効 $transparent = imagecolorallocatealpha($square_new, 0, 0, 0, 127); // 透明度を持つ色を作成 imagefill($square_new, 0, 0, $transparent); // 塗りつぶす imagecopyresampled($square_new, $ImageResource, 0, 0, $x, $y, $square_width, $square_height, $width, $height); imagepng($square_new, $upload_path . $filename); break; // デフォルト Default: break; } |
意外と簡単に出来るので、覚えておいて損はないかと思います。